
|
On this page: All things BUTTON FLY!
Go back to the halfmoon 101 JEANS | Sew Along HOME |
 |
Welcome back to the halfmoon 101 JEANS Sew Along! Today, in this post, we'll be focusing entirely on the button fly (Step 7, View B). You can find the zipper fly post here, if you are doing View A.
There are many micro-steps to inserting the fly, but with this post to compliment the instructions, I hope that you will feel more confident in constructing your concealed button fly.
As always, remember that the seam allowances are all 1.5cm (or ⅝”) unless otherwise stated.
STEP 7, VIEW B - button fly
Start by aligning your fly shield (4), right sides together, with the center front seam of the wearer’s RIGHT leg (1). Pin and sew to the dot only at just 0.5 cm (¼”) seam allowance. (Tip: if your serge-stitch or zig-zag is 0.5cm (¼”) in width, you can use this as an easy guide to maintain the allowance when sewing this seam.)
Then clip into the seam allowance ONLY at the dot marking, making sure you don't clip through any seams.

Press the fly shield away from the leg and seam allowances, then edge-stitch on the wearer’s RIGHT leg close to the fold of the seam, catching seam allowances underneath and making sure to start/stop exactly at the notch.

With right sides together and dot markings matching, align the RIGHT and LEFT front legs (1) along the center front curve. Sew starting at the crotch up to the crotch dot marking using a regular stitch length (approx. 2.5mm (³/₃₂”)). Back-stitch at the marking, then change the stitch to a baste length (approximately 4mm (⅛”)) and continue sewing up toward the waist.

Trim the seams of the wearer’s LEFT leg below the dot ONLY to 0.5cm (¼”). Then press the seams open.

Pin the fly shield out of the way then turn the seam allowance of the wearer’s LEFT leg above the dot to the wrong sides so that the raw edge meets the seam (approx 0.75cm (¼”)). Press this nice and crisp and pin it from the right side.

Place the jeans in front of you, wrong side up, again and flat-fell the center front seam blow the dot marking. Do this by folding the untrimmed seam allowance of the wearer's RIGHT leg around the trimmed allowance of the LEFT leg.
Give this a good press and pin it from the right side as well.

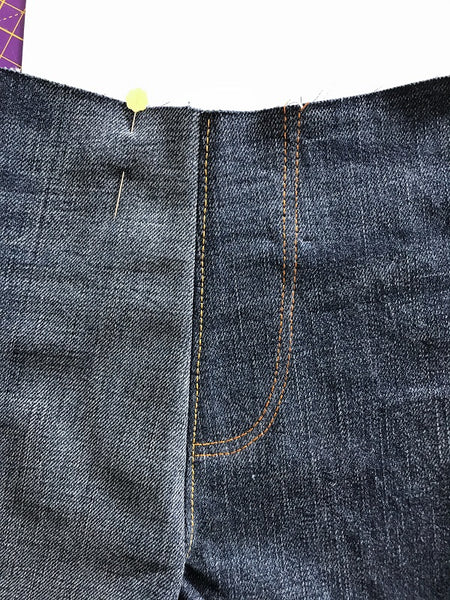
With a single needle, edge-stitch along the length of the center front crotch curve, catching the folded seam allowances underneath.

Using your guide, chalk the curved top-stitch line on the right side of your jeans (please note that I need to update the guide pattern piece as it does not currently have seam allowance at the top end).

With your jeans wrong side facing you, line up the button fly piece (5B) with the center front edge of the wearer’s LEFT leg... then move it the tiniest bit towards the wearer’s LEFT pocket and pin it in place from the right side.
[Tip from Anne: rather than marking the top-stitch and pinning from the right side, you can baste the button fly to the leg from the wrong side. The baste-stitch will then be your top-stitch guide, and you won't have to fiddle with pins!]

(You can see that my machine is NOT happy with top-stitching thread!)
Top-stitch using either a twin-needle or two parallel lines, catching the button fly piece underneath. (Your fly shield is still pinned out of the way.)
Now you can place the fly shield over the button fly and give it all a nice press so that everything lays flat.

From the right side, pin the fly shield in place and use a single needle to top-stitch a second, parallel line below the fly. You will be catching the fly shield underneath.
Place a horizontal bar-tack at the end of this second line (ie. approx. 2cm past the bottom of the curved line), and a diagonal bar-tack just before the curved line straightens out. Both bar-tacks should catch and secure the fly shield underneath.

Now you can remove your baste-stitching above the level of the horizontal bar-tack and admire your beautiful concealed button fly! You can also mark where you'll place the buttons once the jeans are finished.

THAT'S ALL FOR TODAY!
The hardest part is done! Next time we meet we'll be sewing the front and back legs together.
So happy to being sewing the halfmoon 101 JEANS together with you!