

It is the 9th and last day of the Sew Along. Are you ready to finish your halfmoon 101 JEANS?!?! Today we are going to do the beltloops and waistband, hem your jeans (unless you’re leaving them unfinished) and add the hardware. It’s an exciting day!
Before we get started, a few reminders (or, if you're just joining now, bits of info):
- I made a few modifications to my jeans, increasing the rise a bit, which is why the shape of mine may be slightly different to yours. I did this because I already have three fabulous pairs of 101 jeans, so I wanted to make them just a tad different this time around.
- I am using harvested denim, which is why I already have a button on my waistband
- The seam allowances are all 1.5cm (or ⅝”) unless otherwise stated.
Let's do this!
STEP 13
Place the beltloops on your jeans so that the right sides are together and the loops lay flat on the jeans. You’ll want these to be placed at the front pocket top-stitching, the center back and just to the back of the side seam (near the top-stitching).
Pin and sew your beltloops at about 1cm (⅜”) seam allowance to the upper edge of your jeans.
If your zipper was extending past the top edge, like mine was, you may want to shorten it now. Eliminate the extra teeth (by ripping them off with plyers), so that these stop just at the 1.5cm (⅝”) seam allowance, and trim the zipper tape to meet the top edge.

STEP 14
If you would like to put a label on the inside of your jeans, this is a good time to do that. I like to sew my label onto the waistband lining at the center back.
Press the upper edges of your main and lining waistband pieces to the wrong side by 1cm (⅜”). You’ll notice that the upper edge is the one without any notches.

Then place your main and lining waistbands right sides together, edges and notches nicely aligned, and sew the short edges only at the regular 1.5cm (⅝”) seam allowance.

Slip this waistband piece over the top of your jeans, so that the jeans are sandwiched by the waistband piece and the lower edges and notches of the waistband meet and match up with the center and side seams of the jeans.
Because the waistband is curved, you’re going to have to ease in the fabric at the curves. Therefore, as per usual, you’ll want to place a pin where the waistband notches meet the jeans seams first, and then ease in the curves.
Sew along the pinned edge, going through three layers (waistband, jeans, waistband)…as well as over the beltloops. The bulk at the beltloops can be too much for many machines. You may want to manually turn the handwheel to sew through these. And using your needle pack as a “hump jumper” under your presser foot, just behind the needle, will help you to sew over these areas more easily.

Trim along the seams sewn, and clip the corners at the center front.

Then fold the waistband up, pushing out the corners nicely, and give it all a good press (with the beltloops still laying flat against the jeans).
Sew a short line over the beltloops, approx. 2cm (¾”) below the waistband. Then press the beltloops up and so that they fold into the top of the waistband. Do not yet pin them in place, however.
STEP 15
Edge-stitch around the short ends and lower edge of the waistband. Then place the beltloops into the top of the waistband and pin them.

Finish edge-stitching the waistband, sewing it closed and securing the beltloops in place.
STEP 16
Make sure your buttonhole marking is still in the correct spot, or re-mark it if it disappeared. You’ll want it to be centered vertically and about 1cm (⅜”) from the center front.
If you are repurposing jeans and re-using the button from the waistband, like I am, you’ll need to make sure that your buttonhole is placed so that it will close nicely with the placement of the button.

All machines are different, so find your favorite buttonhole setting and make sure it will fit your button before cutting the hole!

If you’re feeling done with your machine and want to have all the sewing finished, then I suggest you flip the last two steps and move on to Step 18 and hem your jeans already. If you are leaving the ankles to fray or re-using hems from repurposed jeans, you’ll get to skip this step.
STEP 18
Using the creases you pressed back in step 11, fold up the bottom of your jean legs to the wrong side by 1cm (⅜”), then again by 1cm (⅜”). Pin in place and top-stitch.
STEP 17
Now all you need to do is set a bit of hardware and you’re ready to go strut your amazing jeans!!
Because I already have a button, I will explain the process of setting your hardware using rivets, and point out the differences when necessary.
You’ll want to have the following hardware and tools:
- Rivets + stems
- Button(s) + stem(s)
- Awl or nail
- Thick , ball point needle (not necessary, but can be helpful)
- Wire cutter
- Hammer
- Anvil, if you have one, or a hard surface that doesn’t damage easily

Before we get started, note the difference between a rivet stem and a button stem.
The rivet stem is smooth… 
… whereas the button stem is more like a screw with ripples to hold the button in place more securely when buttoning and unbuttoning your jeans. 
Start by marking all the parts on your jeans where you will add a button or rivet. When marking for a button, remember that the button will not remain at the center of your buttonhole as there will be tension from the pull of your body.

I like to use a thick embroidery needle with a ball point to start the hole for the stem. Gently poke the needle through the fabric, doing your best to push the fabric threads away rather than breaking them to create the hole. Then use your awl or nail to expand the width of the hole you made with the needle.
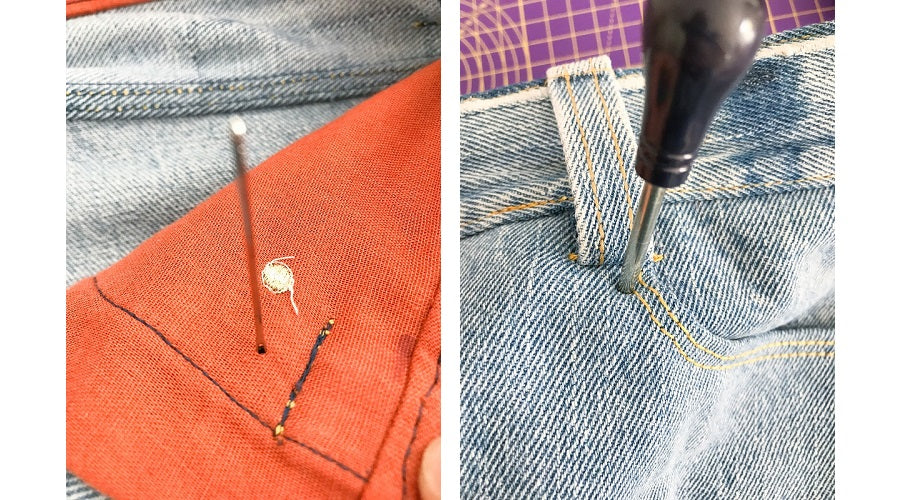
Poke the stem through the hole from the back side.

If you’re setting a button, leave the stem long, as is. If you’re setting a rivet, you’ll want to use your wire cutter to trim down the stem a bit, to about 2mm to 3mm (not more than ⅛") above the fabric.

Place the rivet or button on the stem, then the rivet or button on the anvil or hard surface, so that the stem is facing you. Now, being carefully to hit the stem head-on (not at an angle), slam down that hammer! You may need to pound a few times to get it nice and secure.

If you have a rivet setter, you may be placing the stem on the anvil and slamming the rivet setter rather than the rivet itself.

Set your buttons and rivets as needed or desired and … drum roll, please … YOU’RE DONE!!

Thank you so much for joining me in sewing the halfmoon 101 JEANS! I know I missed photos in a few steps here and there, but I still hope that it adds some value for you and that you’ve found this Sew Along to be fun and helpful!
Please do be sure to share your progress and final jeans on Instagram with #halfmoon101jeans and by tagging me @halfmoonatelier!
Yay! Well done, Anouk!!
thank you sooooo much. I’ve just finished my jeans!! thanks to your fantastic guidance!
anouk