

|
Topics on this page: CHOOSING SIZE AND MAKING INITIAL ADJUSTMENTS LENGTHENING OR SHORTENING THE RISE
Adjustments in other posts: |
 |
written by Anemone (Anne) Harris
Now that you’ve seen how to do some of the most common adjustments, I thought it might be helpful to show an example of how I personally adjusted the fit of my halfmoon 101 JEANS!
CHOOSING SIZE AND MAKING INITIAL ADJUSTMENTS
You should use your natural waist and full hip measurements to choose your base size(s). If your waist and hips are in different sizes you can print both size layers and blend between sizes.
It’s also helpful to measure the circumference of your thighs and compare that measurement + desired ease to the final garment measurements of the pattern. Meghann provides some really valuable information by providing a suggested amount of ease at the thighs (½ - ¾” (1.25-2cm) ease suggested at size 1 and gradually increasing up to ¾ - 1 ⅓” (2-3.5cm) ease at size 18). I personally found this very helpful since I have large thighs and always struggle with how fitted this area should be.

My waist measured 35” (89cm), my hips measured 44.5” (113cm) and my full thighs measured 26.5” (67cm). Based on this I land in size 8 for both my waist and hips but land at more like a size 10 for my thighs. Based on this I print sizes layers 8 to 10.
LENGTHENING OR SHORTENING THE RISE
It’s a good idea to check and, if necessary, adjust the front and back rise of the pattern to match your body measurements.
For your front rise measure your body from the point of crotch seam intersection to approximately 1.5” (4cm) below your navel. For your back rise measure your body from the point of crotch seam intersection to the height you desire at the back. Hint - I find it helpful to tie some elastic around my waist at the level below my navel….the elastic can be at a slight tilt to be slightly higher at the back than the front since that is intended with this “low” rise pattern to give extra coverage at the back.

My front rise body measurement was 9.25” (23.5cm) and my back rise body measurement was 16.5” (42.2cm). I compare to Finished Garment measurement for the size 8 (the size my waist measurement fell in). Based on this I would want to short front rise by 1” (2.5cm) and increase the back rise by ½” (1.25cm).
Since the change in rise I need at the front differs from the back I know I’ll need to use multiple adjustments to change my rise. If I just lower the front by 1” (2.5cm) but raise the back by ½” (1.25cm).... Then the side seams of my jeans would no longer match when I go to sew them together!
I like to break this into multiple steps. Since I’m 5’2” (157.5cm) tall it makes sense that I would have a shorter torso and need to lower the pattern for my torso height. I also know that I have a fuller seat and large thighs so it would make sense for me to need the pivot type adjustments on the back pattern piece which don’t change the side seam.
Step 1 - I cut at the rise lengthen/shorten line and made a ‘torso height adjustment’, lowering both my front and back pieces by the 1” (2.5cm) to reach my desired front rise with my side seams still matching.
However this means my back piece now has a rise that is 1.5” (4cm) shorter than what I need!

Step 2 - To get the total back rise I need I will can add that 1.5” to the back rise by:
- Pivoting to increase the center back height without changing the side seam
- Adding crotch depth by extending the “crotch hook” which increases the total back rise length.
- A bit of both! This is the one I’d choose for my body - I’d add 1”(2.5cm) to the crotch depth by extending the “crotch hook” and then I’d add ½”(1.25cm) by pivoting to increase the center back height. I know that I have full thighs and the difference between the size 8 crotch hook (my hip size) and the size 10 crotch hook (my thigh size) was 1” so this seemed like a good indicator that I needed to add depth.

How do you decide where to pivot?
Honestly, I figured out what I needed on my body just through trial and error over the few years I’ve been making pants. However, if you haven’t yet figured this out, I definitely recommend checking out "WinnMichele’s 2 part series on ‘Fitting the Crotch Hook’" (this link is no longer functioning).
I always take the time to “baste fit” every pair of jeans I make. It’s a bit tedious but I find it to be very worthwhile since different denims can vary in how much they relax. I like to wear my basted together jeans around the house for a while to see how the fabric will relax. Safety pins are highly recommended haha!
This wearing time allows me to make slight adjustments like taking in or letting out the side seam or any other minor changes such as slight adjustments to crotch curve or back rise.
For example, when I basted my jeans together I found that I had some bagginess at the crotch that I wanted to get rid of.

I adjusted this during my baste fitting using this method. Still some wrinkles but those always look better once the seam allowances aren’t in the way:

I also found that I had added a bit too much to the back rise. As I wore my basted jeans about sitting and going up the stairs I found that the waistband settled lower and left a bubble of fabric just below the waistband.
In this picture you can see I’ve pinned out that excess. When I take apart the basting I can still remove this excess rise before doing my final assembly! I adjust on my pattern paper using this pivot adjustment to remove crotch height, then trim my cut fabric to match.

The other thing I’ve discovered while fitting this pair of Halfmoon 101 jeans is how to adjust for the wrinkles I get behind my knees. I get these in all jeans and just finally tackled that fitting problem!
I attempted (in muslin) this version of a knock knee adjustment, pivoting to remove length from the side seam and add length to the inseam. Unfortunately this method didn’t work for me due to the tightness in my thigh area:
Adjustment on left leg only:

It seems what I needed was more width for my full thighs and fleshy knees. This alternate adjustment which adds width at the inseam (at knee level) worked much better for my shape (also shown in muslin for comparison)! The drag lines are reduced, my hem is hanging straighter and no longer laying against my outer ankle.
Adjustment on right leg only:

Now I can leave some extra seam allowance at inseam knee level and adjust for this when I baste fit future jeans. Like here where I initially attempted with adding ½” (1.25cm) at both front and back knee.

Then decided to let out an addition ¼” (0.6cm) at the back seam allowance after seeing how the denim relaxed. This has let me strike a balance I’m happy with to minimize the wrinkles and keep a fairly narrow leg!

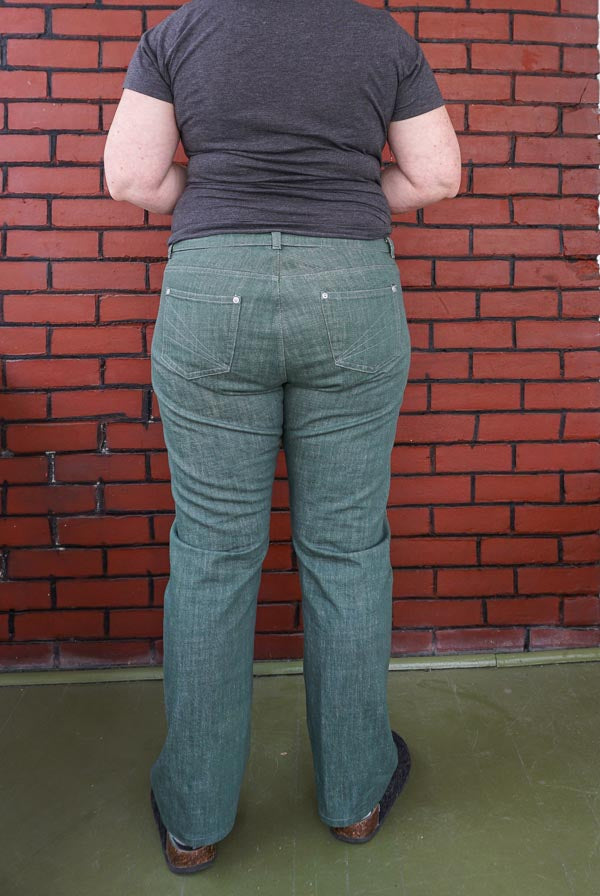
And here’s my final product!
Snug “right out of the wash” fit:


Relaxed fit after wearing about for several hours:


I hope you've found these posts on adjusting the halfmoon 101 JEANS to be helpful!
 |
Anemone (Anne) is a lover of all things garment sewing and fabric. She especially loves pattern testing and occasionally going down fitting “rabbit holes”. Nothing is quite as satisfying as understanding the cause and figuring out a solution to an interesting fitting problem! Anne lives in Saskatchewan, Canada with her spouse and their two adorable (and hilarious dogs). You can follow her sewing adventures on her Instagram account @sewanemone. |
Hi Lucie, I’ve asked Anne about the link to WinnMichele’s series and it seems that this has been taken off line for now. It sounds like she might be updating it? I’ll be sure to upload the link if/when there’s an updated post!
These instructions are fantastic. I have really struggled to understand fit on trousers but this is so clear and I am really looking forward to putting it into practice. I tried to link to the WinnMichele’s 2 part series on ‘Fitting the Crotch Hook’ from you page but it doesn’t link to this and i can’t find it with using ‘search’ on her page. Any ideas how I can access it?