

|
On this page:
Go back to the halfmoon 101 JEANS | Sew Along HOME |
 |
On page 8 of the halfmoon 101 JEANS instructions, you’ll find tips on making your muslin. Whether you’re using muslin fabric or your nice fabric, I recommend you baste-fit before constructing your jeans. Even though I’ve made several jeans from this pattern by now, I still do this each time as I’ve found that different fabrics simply behave differently on my body. Sometimes the sizing is perfect, and sometimes I need to pinch out a bit. Yes, it’s an added step. But it could potentially save you a ton of time and major frustration down the road.

#1 - Finding muslin fabric in a twill weave may be tricky. If you’re muslinning with actual plain-weave muslin fabric, you’ll want to be cognizant of the difference in behavior between a twill-weave and plain-weave. Namely that a twill is likely to have more give, so it’s ok if your plain-weave muslin is a bit tighter on you than you’d want your final jeans to be.
#2 - You don’t want to use two different fabrics. Rather than cutting the muslin pieces in one fabric, then having to do this again in your nice fabric, you could also purchase just a bit more of the nice fabric, then follow these steps:
- Mark the size you think you should cut and also the size that I (ahem, the instructions) think you should cut (of the questions I’ve received, most people think they need a higher size than I recommend). I recommend doing your markings using disappearing ink.
- Cut around the larger of the two and baste together, comparing the different sizes. Use pins to pinch out areas that may have excess fabric and make your final markings with disappearing ink.
- Remove baste stitches and trim fabric wherever needed so that you have 1.5cm seam allowances. Now you’re ready to construct your jeans!
Having purchased slightly more denim than needed for one pair of jeans, you will hopefully have enough fabric in case you mis-cut anything and need to cut out a certain pattern piece more than once.
You don’t need all the pattern pieces to do your muslin and baste-fit. Using the tips on p.8 as a guide, cut out the following pattern pieces:
|
 |
Remember to set your stitch length to approx. 4mm! This will make unpicking a jiffy. Also, be sure to maintain a 1.5cm seam allowance when creating the muslin (there are no deviating seam allowances for these pieces).
Piece your muslin together as follows:
- Start by sewing the front pocket facings to the corresponding front legs, so that the right sides of facings and legs are facing you. (I am using reclaimed denim here, which is why I already have a coin pocket - it was already a part of the pocket facing on the jeans and I was happy to leave it there!)

- Align the bottom edge of the back yokes (3) with the top edge of their corresponding back legs (2), wrong sides together, so that the notches match up. Place the first pin at the notch marking...

... then pin the sides ...

... before easing and pinning the rest of the curved edge.

You’ll want to give this seam a press before continuing.
- With front legs (1+6) wrong sides together, pin the center front from the dot marking down to the bottom of the crotch curve. With back legs (2+3) wrong sides together, pin the entire length of the center back, from the top edge to the bottom of the crotch curve.
Sew the front crotch curve and the back crotch curve, then press seams to one side for now.

- With the front legs (1+6) and back legs (2+3) wrong sides together, pin the entire length of the inseam and the side seams, matching up notches.
Sew.

- Align the bottom edge of the waistband (this is the longer edge with notches) with the top edge of the jeans, wrong sides together and notches matched up. (The notches on the waistband will meet the center back seam, side seams and what will be the front center seams.) Place a pin at each notch first before easing in the rest of the curved edges. (I, ahem, forgot to take a photo of this:)
Sew.
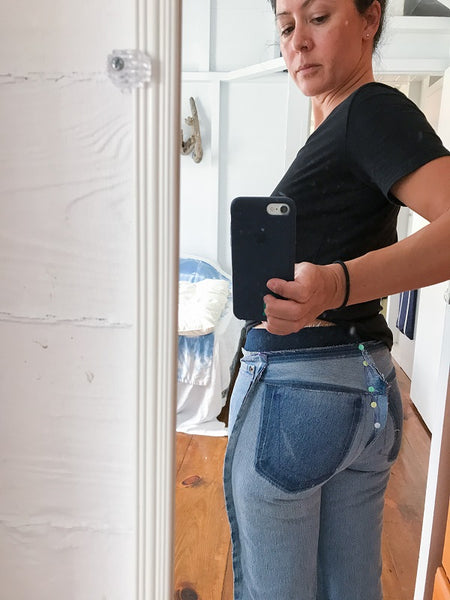
Now you have your muslin or baste-fitting garment! Take some pins, a measuring tape, paper and pen with you and go stand in front of a full-length mirror (or stand on your toilet at your bathroom mirror…but be careful!) and take a look at the fit. Walk around your house a bit. Sit down. Jump and dance about. How do they feel? Identify minor or major mods that may be needed, measure these, pin out excess fabric and take note.
I wanted to try making a mid-rise pair of halfmoon 101 JEANS, as I thought it might be nice to have something slightly different after having made so many already. You'll see, therefore, that I'm having to pinch out a chunk of fabric at the small of my back.
If you need to make further adjustments, perhaps these posts will help you. Otherwise, you can get started here with jeans prep + back pocket designs!
If everything seems to be in place, or if you only need a few pinch-out-here, pinch-out-there modifications, then you’re ready to undo your basted seams and start prepping your halfmoon 101 JEANS!
