
|
On this page:
Go back to the halfmoon 101 JEANS | Sew Along HOME |
 |
You've measured your body, made some adjustments and done a baste-fit. Today we finally start sewing our halfmoon 101 JEANS! We're going to start nice and easy here and just go through steps 1 to 5 of the instructions as these are all about prepping bits and pieces.
At the end of this post, I also have free downloadable back pocket design templates for you!
Remember that the seam allowances are all 1.5cm (or ⅝”) unless otherwise stated.
STEP 1
You already have the front legs (1), back legs (2), back yoke (3), front pocket facing (6) and waistband (10) cut out from your baste-fit. You can unpick those pieces and press them again if that helps.
Cut out the rest of your pattern pieces, including interfacing. Remember that the fly shield (4), zipper/button fly (5a/b), pocket bags (7) and waistband lining (10) will be cut from your lightweight cotton lining fabric.

Before moving on, you'll want to make sure that all of your pieces are marked R for wearer's RIGHT and L for wearer's LEFT. This will help prevent a lot of confusion through the sewing process.
STEP 2
Fuse the interfacing to the wrong side of the waistband (10, the denim fabric), the fly shield (4) and, the button fly (5B), if you're doing view B.

STEP 3
Prepare your fly shield (4) by sewing the short angled end, right sides together. Then trim the seam allowances and fold it right sides out, pushing out the corner nicely and giving it a good press. You can also clip the little triangle poking out of the long open edge.

STEP 4
Finish the edges of the following pieces:
• Long, raw edge of fly shield (4)
• Curved edge of zipper or button fly (5A or 5B)
• Curved edge of front pocket facing (6)
• One long edge of belt loop piece (11)
• Center front seam, from waist to crotch dot marking on wearer’s RIGHT front leg (1)
If you have a serger/overlocker, be sure you do not trim any fabric from the edges while finishing them.
If you are using a standard sewing machine, you can use a zig-zag stitch along the edges (or your favorite edging stitch).

You'll notice that my right pocket facing already has a coin pocket and my belt loops are already finished. That's because I am not using "virgin denim", but have reclaimed, or harvested, denim from old jeans, so I was able to simply re-purpose these!
You may also see that the right pocket facing has a couple divots taken out of the edges. That's because I had to cut around the rivets...but I'm not too bothered by this because these are in the seam allowance anyway.
STEP 4B
If you're doing a button fly, you'll want to use the top-stitch & button placement guide to mark the buttons on your button fly (5B).
Before setting your button-holes, you may want to do a test button-hole with your top-stitch thread before committing to this on your button fly piece. Not all machines play nicely with top-stitching thread...especially when it comes to button holes. You can use your regular thread for the button holes if needed.
After testing and deciding upon the thread situation, set your button-holes and open them up before continuing on to Step 5.
STEP 5
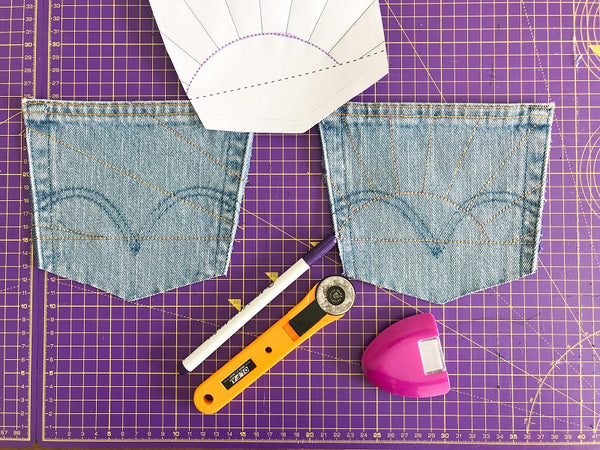
If you'd like to create a nice back pocket design, now is the time to do that!
Want some fun pocket details but need some help thinking of ideas? I've created a free PDF with 6 back pocket templates that you can either trace off directly to your back pockets, or use as inspiration to create your own design! Each page has a small test square and a light outline of the back pocket pieces (including markings) so that you can easily line the templates up with your pocket pieces.
Now that you've got fun back pockets, fold the top edges of the coin (8) and back (9) pockets to the wrong side by 1cm (⅜”), and then another 1cm (⅜”), pressing each time.
Fold the long raw edge of your belt loop piece (11) to the wrong side by 1cm (⅜”) and press. Then do the same thing with the finished edge, so that the raw edge is hidden.
Set your stitch length to 3mm or 3.5mm, then top-stitch 0.3cm (⅛”) from the top edges of the pockets (8, 9) and down the center of the belt loop piece (11). Do this with your twin needle, if you have one. Page 12 of the instructions has some tips on top-stitching.
(Again, as I'm using reclaimed denim, those steps were already done for me.)
Fold the remaining edges of the pockets to the wrong side by 1cm (⅜”) and give them a good press. I like to keep mine under a heavy book or two until I'm ready to use them.
THAT'S ALL FOR TODAY!
In a few days, we'll be going through steps 6 and 8 - fully attaching the front and back pockets and adding the back yoke. We'll take step 7A (zipper fly) and 7B (button fly) nice and slowly a week later on their own.
So glad to being sewing the halfmoon 101 JEANS together with you!